This is a legacy guide for self-hosting v3 using Docker, you can find the v4 guide here.
Overview
Support
It’s dangerous to go alone! Join the self-hosting channel on our Discord server.Caveats
The v3 worker components don’t have ARM support yet.
Please consider these additional warnings
Please consider these additional warnings
- The docker checkpoint command is an experimental feature which may not work as expected. It won’t be enabled by default. Instead, the containers will stay up and their processes frozen. They won’t consume CPU but they will consume RAM.
- The
docker-providerdoes not currently enforce any resource limits. This means your tasks can consume up to the total machine CPU and RAM. Having no limits may be preferable when self-hosting, but can impact the performance of other services. - The worker components (not the tasks!) have direct access to the Docker socket. This means they can run any Docker command. To restrict access, you may want to consider using Docker Socket Proxy.
- The task containers are running with host networking. This means there is no network isolation between them and the host machine. They will be able to access any networked service on the host.
- There is currently no support for adding multiple worker machines, but we’re working on it.
Requirements
- 4 CPU
- 8 GB RAM
- Debian or derivative
- Optional: A separate machine for the worker components
Option 1: Single server
This is the simplest setup. You run everything on one server. It’s a good option if you have spare capacity on an existing machine, and have no need to independently scale worker capacity.Server setup
Some very basic steps to get started:On a Debian server, you can run these commands
On a Debian server, you can run these commands
Trigger.dev setup
- Clone the Trigger.dev docker repository
- Run the start script and follow the prompts
Manual
Alternatively, you can follow these manual steps after cloning the docker repo:- Create the
.envfile
- Generate the required secrets
-
Replace the default secrets in the
.envfile with the generated ones - Run docker compose to start the services
Tunnelling
You will need to expose the webapp to the internet. You can use Ngrok for this. If you already have a working reverse proxy setup and a domain, you can skip to the last step.- Start Ngrok. You may get prompted to sign up - it’s free.
-
Copy the domain from the output, for example:
1234-42-42-42-42.ngrok-free.app -
Uncomment the
TRIGGER_PROTOCOLandTRIGGER_DOMAINlines in the.envfile. Set it to the domain you copied.
- Quit the start script and launch it again, or run this:
Registry setup
If you want to deploy v3 projects, you will need access to a Docker registry. The CLI deploy command will push the images, and then the worker machine can pull them when needed. We will use Docker Hub as an example.- Sign up for a free account at Docker Hub
-
Edit the
.envfile and add the registry details
- Log in to Docker Hub both locally and your server. For the split setup, this will be the worker machine. You may want to create an access token for this.
- Required on some systems: Run the login command inside the
docker-providercontainer so it can pull deployment images to run your tasks.
- Restart the services
- You can now deploy v3 projects using the CLI with these flags:
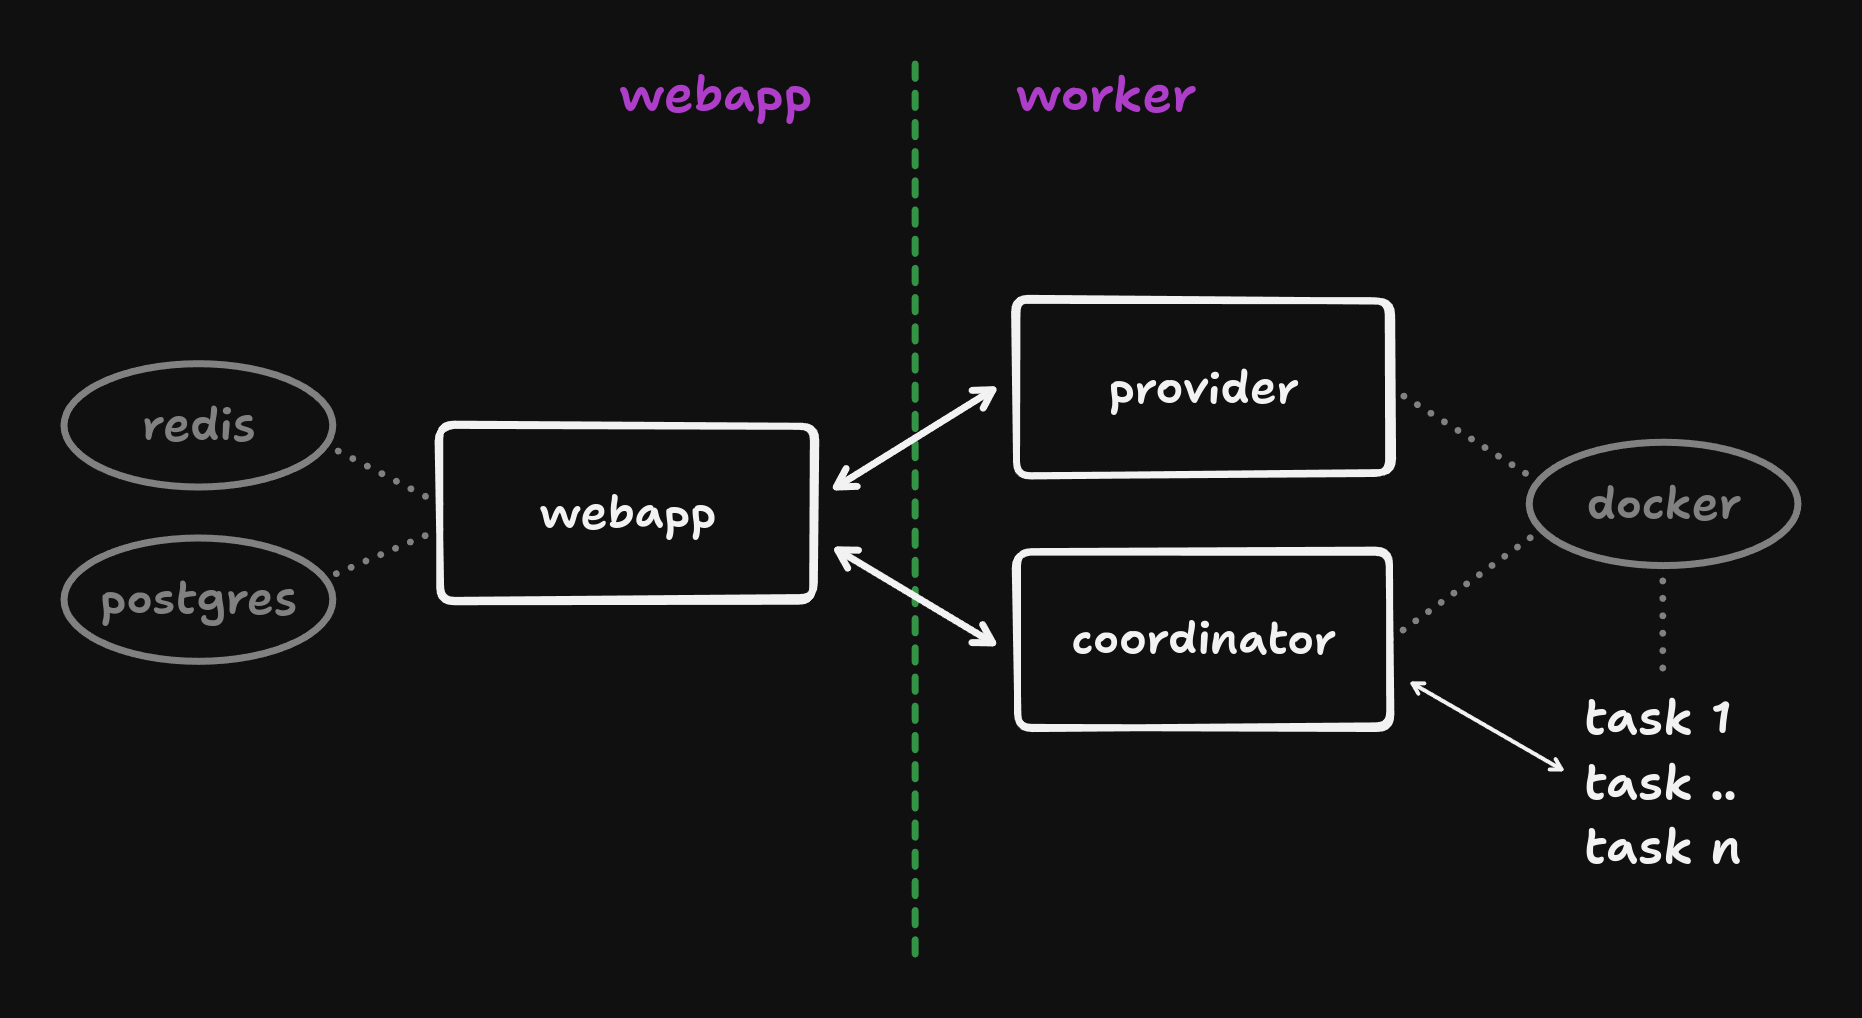
Option 2: Split services
With this setup, the webapp will run on a different machine than the worker components. This allows independent scaling of your workload capacity.Webapp setup
All steps are the same as for a single server, except for the following:- Startup. Run the start script with the
webappargument
- Tunnelling. This is now required. Please follow the tunnelling section.
Worker setup
- Environment variables. Copy your
.envfile from the webapp to the worker machine:
- Startup. Run the start script with the
workerargument
- Tunnelling. This is not required for the worker components.
- Registry setup. Follow the registry setup section but run the last command on the worker machine - note the container name is different:
Additional features
Large payloads
By default, payloads over 512KB will be offloaded to S3-compatible storage. If you don’t provide the required env vars, runs with payloads larger than this will fail. For example, using Cloudflare R2:Version locking
There are several reasons to lock the version of your Docker images:- Backwards compatibility. We try our best to maintain compatibility with older CLI versions, but it’s not always possible. If you don’t want to update your CLI, you can lock your Docker images to that specific version.
- Ensuring full feature support. Sometimes, new CLI releases will also require new or updated platform features. Running unlocked images can make any issues difficult to debug. Using a specific tag can help here as well.
v3 tag. You can override this by specifying a different tag in your .env file. For example:
Auth options
By default, magic link auth is the only login option. If theEMAIL_TRANSPORT env var is not set, the magic links will be logged by the webapp container and not sent via email.
Depending on your choice of mail provider/transport, you will want to configure a set of variables like one of the following:
Resend:
SMTP
Note that settingSMTP_SECURE=false does not mean the email is sent insecurely.
This simply means that the connection is secured using the modern STARTTLS protocol command instead of implicit TLS.
You should only set this to true when the SMTP server host directs you to do so (generally when using port 465)
AWS Simple Email Service
Credentials are to be supplied as with any other program using the AWS SDK. In this scenario, you would likely either supply the additional environment variablesAWS_REGION, AWS_ACCESS_KEY_ID and AWS_SECRET_ACCESS_KEY or, when running on AWS, use credentials supplied by the EC2 IMDS.
WHITELISTED_EMAILS env var. For example:
https://<your_domain>/auth/github/callback and you will have to set the following env vars:
Checkpoint support
Checkpointing allows you to save the state of a running container to disk and restore it later. This can be useful for long-running tasks that need to be paused and resumed without losing state. Think fan-out and fan-in, or long waits in email campaigns. The checkpoints will be pushed to the same registry as the deployed images. Please see the registry setup section for more information.Requirements
- Debian, NOT a derivative like Ubuntu
- Additional storage space for the checkpointed containers
Setup
Underneath the hood this uses Checkpoint and Restore in Userspace, or CRIU in short. We’ll have to do a few things to get this working:- Install CRIU
- Tweak the config so we can successfully checkpoint our workloads
- Make sure everything works
- Enable Docker experimental features, by adding the following to
/etc/docker/daemon.json
- Restart the Docker daemon
- Uncomment
FORCE_CHECKPOINT_SIMULATION=0in your.envfile. Alternatively, run this:
- Restart the services
Updating
Once you have everything set up, you will periodically want to update your Docker images. You can easily do this by running the update script and restarting your services:.env file, but we will try to keep these changes to a minimum. Check the .env.example file for new variables.
From beta
If you’re coming from the beta CLI package images, you will need to:- Stash you changes. If you made any changes, stash them with
git stash. - Switch branches. We moved back to main. Run
git checkout mainin your docker repo. - Pull in updates. We’ve added a new container for Electric and made some other improvements. Run
git pullto get the latest updates. - Apply your changes. If you stashed your changes, apply them with
git stash pop. - Update your images. We’ve also published new images. Run
./update.shto pull them. - Restart all services. Run
./stop.sh && ./start.shand you’re good to go.
Troubleshooting
- Deployment fails at the push step. The machine running
deployneeds registry access:
- Prod runs fail to start. The
docker-providerneeds registry access:
CLI usage
This section highlights some of the CLI commands and options that are useful when self-hosting. Please check the CLI reference for more in-depth documentation.Login
To avoid being redirected to the Trigger.dev Cloud login page when using the CLI, you can specify the URL of your self-hosted instance with the--api-url or -a flag. For example:
Custom profiles
You can specify a custom profile when logging in. This allows you to easily use the CLI with our cloud product and your self-hosted instance at the same time. For example:list-profiles command:
Verify login
It can be useful to check you have successfully logged in to the correct instance. You can do this with thewhoami command, which will also show the API URL:
Deploy
On Trigger.dev Cloud, we build deployments remotely and push those images for you. When self-hosting you will have to do that locally yourself. This can be done with the--self-hosted and --push flags. For example:
CI / GitHub Actions
When running the CLI in a CI environment, your login profiles won’t be available. Instead, you can use theTRIGGER_API_URL and TRIGGER_ACCESS_TOKEN environment
variables to point at your self-hosted instance and authenticate.
For more detailed instructions, see the GitHub Actions guide.
Telemetry
By default, the Trigger.dev webapp sends telemetry data to our servers. This data is used to improve the product and is not shared with third parties. If you would like to opt-out of this, you can set theTRIGGER_TELEMETRY_DISABLED environment variable in your .env file. The value doesn’t matter, it just can’t be empty. For example: